WHAT YOU NEED TO KNOW: What is lay person CPR on children? Lay person cardiopulmonary resuscitation (CPR) is an emergency procedure for a child who is at least 1 year old. A lay person is someone who is not a trained healthcare worker. A child may need CPR because his heart stopped or he stopped breathing. This may be due to an accident, injury, or medical condition. CPR combines chest compressions with rescue breathing. A chest compression is when you put pressure on and off the child's chest. Rescue breathing means giving breaths to the child through his mouth, nose, or both. What should I do if I find a child who is not breathing normally? - Call 911 immediately, or send someone to call for help. Call 911 before you start CPR. The faster help arrives, the greater the chance the child will live. Stay on the telephone with the 911 operator until he tells you to hang up.
- Make sure the area is safe to enter, and approach the child. Move him only if the area is dangerous, such as in a fire. Tap the child's shoulder. Ask loudly, "Are you okay?"
- Kneel beside him. Look to see if his head, neck, or back may be hurt. Carefully turn him onto his back while you support his head and neck. Keep the child's body straight as you turn him onto his back.
- Begin CPR if the child is not breathing or is only gasping. Continue CPR until he responds, help arrives, or an automated external defibrillator (AED) becomes available. An AED is a device that gives a person's heart a shock if it is needed. AEDs are often kept in public areas and are usually mounted to a wall.
How do I give CPR to a child? - Learn the steps used to give CPR to children by remembering C-A-B: Chest compressions, Airway, and Breathing. Do 30 compressions immediately. Then open the child's airway. Hold the airway open and give 2 rescue breaths. Repeat a pattern of 30 chest compressions and 2 rescue breaths until the child responds, help arrives, or an AED becomes available.
- If you are not able to give rescue breaths, you can do chest compressions without giving rescue breaths. Chest compressions alone make it more likely that the child will live than if you do nothing at all. Do chest compressions until the child responds, help arrives, or an AED becomes available.
How do I give chest compressions? Chest compressions press the heart between the spine and sternum (breastbone). This forces blood out of the heart and to the child's brain and body. - Use one of the following methods, based on the child's size. Give chest compressions with one hand if the child is small. Use both hands if the child is larger than you. For both positions, point your fingers up, and keep them off the child's chest. Compressions are done over the sternum. This is where the child's ribs meet in the middle of his chest, between the nipples. Do not lay your fingers on the chest, because you may do compressions in the wrong place. Incorrect hand positioning can break the ribs during compressions.
- One hand: Put the heel of your hand on the lower half of the child's sternum. Keep your other hand on the child's forehead. Get up on your knees and position your body right over the child. With the heel of your hand, press straight down on the child's chest 2 inches (5 centimeters). This should be at least ⅓ the depth of the child's chest. Keep your arm straight when you do chest compressions. Look down at your hand.
- Both hands: Put one of your hands on top of the other. Put the heel of your bottom hand on the lower half of the child's sternum. Press both hands straight down on the child's chest 2 inches (5 centimeters). This should be at least ⅓ the depth of the child's chest. Keep your arms straight when you do chest compressions. Look down at your hands.
- Do not push your hands forward when you press down. Go only up and down. The compressions should be constant and equal. This means that it should take the same amount of time to press down as it does to go back up. Allow the chest to relax completely between compressions. This allows blood to come back into the heart before you compress again. Leave your hands on the child's chest in the correct hand position between compressions.
- Do 30 chest compressions at a rate of at least 100 to 120 every minute (2 per second). Push hard and push fast. Hard, fast compressions are more likely to keep the child's brain and heart alive. Count the compressions out loud to help you do them at a steady, even speed.
How do I open the child's airway? - Put 1 hand on the child's forehead and press firmly backward to tilt his head back. Do not place your hand on the back of his neck to tilt his head.
- Lift the child's chin with your other hand. Hold his mouth open. Do not press deeply into the soft tissue under his chin, because this can close his airway.
- Look into the child's mouth for something that may be blocking his airway at the back of his throat. Examples are food and small toys. If you see something that looks easy to get, carefully scoop it out with your finger.
How do I give rescue breaths? - Take a deep breath and put your lips around the child's mouth, nose, or both, making an airtight seal. If your mouth only covers the child's mouth, gently pinch the child's nose closed. This stops air from escaping through the nose.
- Give 2 breaths (1 second for each breath) into the child's mouth. Do not give large breaths. Do not breathe hard or fast. Take a normal breath for yourself after each breath that you give.
- The child's chest will rise each time you give a rescue breath if his airway is open. You may need to change his head position to reopen his airway. If you still cannot get air in, the airway may be blocked by an object. Look again to see if you find an object you can remove.
How do I use an AED? The following are general directions for AED use. Follow the step-by-step directions that may be found on or inside the AED. Do not remove an AED from its storage case unless you intend to use it. Remove all clothing from the child's chest before you open the AED. 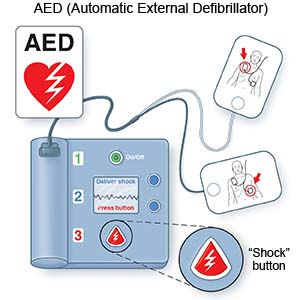
|
- Open the AED: There may be a latch on one or both sides of the device to open it.
- Find the electrode pads: You may need to pull a handle or open or unwrap the pads. The pads may be attached to the device by thin wires. Do not detach the pads from the device.
- Prepare the pads: Electrode pads may have a sticky side that sticks to the child's chest. You may need to remove paper backing from the pads to expose the sticky side before they can be used.
- Prepare the child: Remove any medicine patches on the child's chest and wipe the area. Move the child out of water if needed. Wipe any water, sweat, or blood off his chest. The skin must be dry before you apply the pads.
- Apply the pads: Place one pad on either the left or right side of the upper chest, toward the middle and below the clavicle (collarbone). Place the other pad on the opposite side, just below and to the side of the breast. You may also place each pad on each side of the ribcage, just below and to the outside of the breasts.
- Turn on the AED: The on button or switch should be clearly marked. The AED will tell you what to do next. If the AED tells you to shock, press the flashing red light. Do not touch the child when the AED analyzes or shocks the child. If no shock should be given, the AED will tell you to continue CPR.
- Continue CPR: Give CPR again immediately after you give a shock or the AED is done analyzing. Continue CPR until the child responds or help arrives. Stop CPR only to let the AED analyze.
What can I do to help prevent respiratory and cardiac arrest in children? - Foreign body airway obstruction: Do not leave small objects within the reach of children. Children tend to put small objects into their mouths. Examples include batteries, coins, marbles, buttons, balloons, and small toys or toy parts. Do not allow your child to hold anything small enough to fit through a toilet paper roll. Airway obstruction can also be caused by foods such as hot dogs, grapes, nuts, popcorn, and hard candy.
- Suffocation: Do not leave plastic bags within a child's reach. Children may put plastic bags over their heads, making them unable to breathe.
- Strangulation: Keep drapery and extension cords out of the reach of children. Do not put any type of cord or string around a child's neck. Some examples are cords or strings with pacifiers or jewelry attached to them.
- Drowning: Do not leave your child alone in or near water. This includes a pool, bathtub, or pail of water.
- Car safety: Keep your child secured in a car safety seat while you are driving. Never leave your child in a car alone. Do not drive if you have been drinking alcohol, or if you have taken illegal drugs or medicines that make you sleepy.
- Falls: Do not leave your child alone on a high surface, such as a changing table. Use toddler gates at the top of stairs. Stand near your child when he climbs on high playground equipment.
- Gun injuries: Store guns in a locked safe or cabinet out of the reach of children. Keep guns unloaded. Store and lock all bullets in a separate place out of the reach of children.
- Poisoning: Keep cleaning supplies and other harmful products out of children's reach and locked up tightly.
|